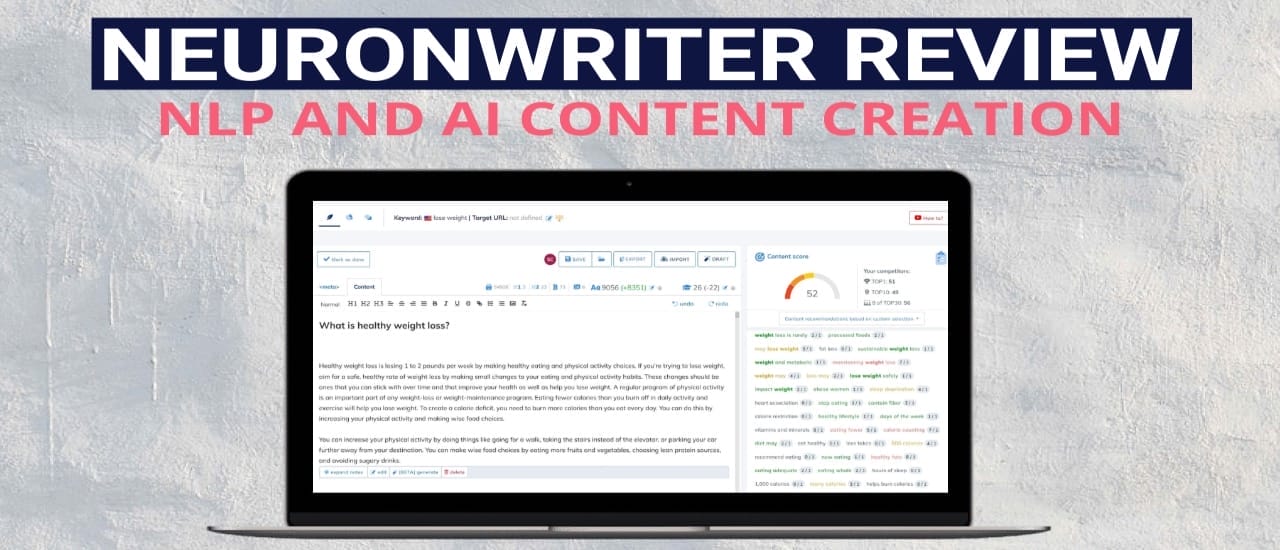
Neuronwriter Review: NLP or Natural Language Processing is a way for Google to understand websites better. It allows Google to understand the very nature of our content, whether it’s in text or video format. This makes Google rely less on keywords and more on syntax and sentiment. This is where Neuronwriter fits in. It’s an NLP and AI tool that helps you to make better content, and to rank higher…
Watch video review here
Today we’re going to be looking at Neuronwriter. It’s an NLP driven content creation tool that uses GPT-3 to help you build articles fast. So let’s take a look at how it works.
Features
To get started, you’ll start a project using your website name, and then we’ll jump into New Analysis. Here, we need to put in our idea. So let’s say we’re going to focus on losing weight. We’ll hit start and let it do its thing. So in this case, it took less than a minute to bring up its content ideas. We’ll hit View to see what it’s come up with. It will give you a list of the top websites with a content score on the side. So it’s automatically chosen the top ten. But if you look at these, these have a low content score, so we could replace them with something a bit higher, or we could just focus on the top eight if you’d like. We hit next. So what it’s going to do is it’s going to look through the top articles and find the most popular keywords. It will give you an idea of what to focus on to rank well.
Okay, so here we go. We have an area here where we can paste an article if we want to improve it, or we can click on Draft and go straight to creating a new article. But let’s just take a look at what we have here. If you look at top analysis, you can check the keyword difficulty, how hard it would be to rank for these keywords. And it’ll give you additional information like the Moz Rank– the Moz Page Authority, all of these. You can also have a quick look through of all the H1, H2, H3 headings. You can see which articles use images, videos, iframes, tables or forms in their content. And you can also have a look at all the different keywords. So back at the content editor, we’re going to click on Draft to get started with the article. So it brings you to this page, which is more focused on sending an article to your team. So for example, you could fill in a title and a meta description – which you’d use for SEO purposes. So you’ve got some keyword ideas on the side here that you can use to help you create your title and description.
Okay, in the article layout, you can go and choose different headings that you would like to add. So for example, what is healthy weight loss? How fast will you lose weight? Okay, let’s choose those three. You also have questions that you can look through, drinks to lose weight, that to do if I keep losing weight, etc. You can add these as well to your draft. I’m just going to keep it simple with these three. You can also add assets. So if there’s certain files or images that you want your writers to add, you can add a link in here and it will be easy for them to jump to that asset.
Okay, once you’ve set out your article layout, you’ll click Copy to Editor. So this is the main part of the tool. You are trying to rank your article in the top 10 so it will tell you here if you want to rank at number 1, you would need a content score of above 51 and if you want to rank the top 10, you need a content score of over 49. So our content score is quite low at the moment. We can juice it up by looking at the keywords that we have here. Now the tool gets these keywords from the articles that we chose earlier, but it also adds additional keywords that it thinks will help you to rank better.
You can also look at additional keywords here. You may find something that’s not listed in the articles and you can grab it from this section. And you also have YouTube keyword ideas. The titles for YouTube videos are normally less SEO-focused, but more focused on building hype. So you might be able to find something here that could make your article stand out more. Or if you’re writing a script for a YouTube video, you could also grab some ideas from here. Okay, once you have your headings ready, you can quickly go through and adjust them if you want to. So you could edit these to make them more unique or you can leave them the same. It’s completely up to you. It will be a mix and match of different headings from different websites so you shouldn’t have a problem with that.
Now to generating content. Now with each one of these headings you can simply click Beta generate. That will fill in the heading here as well as a bunch of keywords that it’s going to try to focus on. You’ve got some settings that you can change here as well. With a colder number you’ll get more reliable content and with a higher temperature number you’ll get more unique and longer content. So the default is 0.3. So we’ll give that a try and this is what it gives us. You can choose to use the text or you can generate again, I’m just going to use that text. Once you have the text ready, you can also highlight it and expand. Okay, if we like this text, we can just say use text and it will add it on so we can extend our paragraphs and make our article longer.
Okay, another option you have is the quality. So you can choose high quality or low quality content. So, let’s try the low quality and see what we get and let’s try it with high quality. And this is what you get. Okay, you can also click on one of these keywords, copy it to your clipboard and then when you’re generating your text, you can just add it in here. If you don’t like a keyword, you can add it to the negative list and that will remove it from your article. Okay, let’s generate text for the rest of this article as well. We’ll just leave it on the standard settings and see what we get. You can pause the video to read the text. Okay. As we use keywords in the article, they will highlight here according to how often they’re used. So in this instance, we’ve used losing weight nine times and we’re required to use it between two to nine times. So by simply adding the right keywords, whether it’s in the Basic or the Extended section, we can slowly build up our content score until we’ve reached the desired amount, which will be over 51. Once the article is ready, you can simply export it or copy it into your WordPress blog.
Pros
So the pros of using this software, it does give you excellent NLP results. There’s a lot of keywords added as well as those additional keywords that aren’t from those chosen websites. It’s also great for teams. As you’ve seen, there’s an easy way to add assets and put in the title and kind of direct your writers on the way you want your article to look. And it also has an excellent video guide. So if you’re a bit confused on how to use the tool, you can jump over here and quickly go through the repository and find out how everything works. The videos are quite short and straight to the point.
Cons
There aren’t too many cons to this tool. The interface could be better streamlined for non-team users. As I write all my articles myself, I don’t need those additional pages for teams. I would simply like to jump straight into the Drafts and start creating my article. Also, the monthly credits aren’t as good as they could be. If they increased the AI credits, I think it would boost this tool tremendously.
Alternatives
If you’re looking for a direct alternative. To Neuronwriter, then Scalenut is your best option. It’s a more mature product with lots of additional features. It also has lots more AI templates to choose from so you can create a variety of different text.
Next up is Writerzen. It has all the NLP features that you’ll need as well as one of the best keyword research tools. Writerzen is primarily a tool for helping you find low competition longtail keywords for your articles, but its NLP features are pretty good as well.
Next, we have ClosersCopy. ClosersCopy has recently added NLP features under the name SEO. it works very similarly to Neuronwriter to help you structure your articles. It also has more AI content tools and a new full article generator under the name Drafts. So my final score for Neuronwriter is a 7.5 out of ten. For what it is, it is a very strong NLP tool. The AI content is quite good. I would just like a few more tools to be added in. As you can see, the team is working on adding additional features such as a Plagiarism Checker and image recommendations, as well as additional article templates so I can see this tool competing with– with some of the bigger tools in this space very soon. Okay, so that’s our review of Neuronwriter. If this has helped you out at all, please give it a thumbs up and we’ll see you next time.
You can get Neuronwriter here.
NeuronWriter works best alongside a keyword research tool — see how WriterZen handles the keyword and topic research phase that feeds into NeuronWriter’s optimisation workflow. For how NeuronWriter compares to its closest competitor, see our NeuronWriter vs ClosersCopy comparison. Both tools support the strategy covered in our complete SEO guide.
Last Updated on May 22, 2026
With more than fifteen years of blogging experience, I have contributed to numerous respected websites and publications. I am also the author of multiple books that have sold thousands of copies and currently lead a successful digital sales business. Writing remains my core passion, and I am dedicated to creating meaningful stories and insights that resonate deeply with readers.