Start a Merch By Amazon T-Shirt, PopSocket, Hoodie or Tote Bag Business: If you’re looking to start your own online business, Merch By Amazon might be the best way to start without any upfront costs. They let you create and sell your products through Amazon.com. There are a few things to keep in mind when trying to start a Merch By Amazon t-shirt business, but with a little work and some planning, you can be successful.
Getting Accepted to Merch By Amazon
Before you do anything else, make sure that you’ve Requested An Invitation to join Merch By Amazon. This just means that you apply to join. It can take a long time time before Amazon gets to your request. When you apply, it helps if you can show them a link to some of your previous designs. You can use all the steps below to create designs and upload them to RedBubble. You can use your free RedBubble store as your portfolio to apply with.
Design Ideas
To create designs for MBA, you’ll need to come up with a good idea. The best way to do this is to think about what you’re passionate about or what you know a lot about. Once you have an idea, do some research to see if there’s a market for it. You can also use websites like Merch Informer to find popular designs that people are already selling.
Creating Your Designs
Merch By Amazon will not accept any designs if they are not exactly the right dimensions. The dimension for their products are:
4500px by 5400px – t-shirts, sweatshirts, long sleeve t-shirts and the back of pullover hoodies
4500px by 4050px – front of pullover hoodies and zip hoodies
485px by 485px – PopSockets grips
1800px by 3200px – iPhone and Samsung phone cases
2925px by 2925px – tote bags and throw pillows
In order to be able to create large sizes (like 4500px by 5400px), we’ll need to use design software that allows for large sizes. Your best options are Canva Pro (the free version doesn’t allow for transparent PNG downloads), Pixelied Lifetime or Merch Informer. Although Merch Informer is a tool used to find ideas, it also has a design tool that comes with all the product sizes preset, and a tool to automate your designs.
In this example I’m going to focus on t-shirts. Once you’ve chosen a platform to work on, login and create a canvas that is 4500 x 5400px in size. I recommend making the background black as you’ll mostly be working with lighter colors. Black t-shirts sell the most on Merch By Amazon, so I like to start all my templates in black.
Start a Merch By Amazon T-Shirt Business
Fonts
Canva, Pixelied and MerchInformer all have a lot of fonts pre-installed to work with. It’s more than likely that you will still find fonts that you prefer more. You can always upload your own fonts to these sites. You can get a lot of free fonts on Google Fonts. If you want to use fonts from other websites, make sure that they are Free For Commercial Use or Public Domain, otherwise, you need to pay to use them.
Choose your font and write some funny text, something interesting, or something relatable on your design. Some designs use only text (without any image) and they sell well. If you use a nice-looking text and it’s funny or memorable – it’s very possible to make sales without having to add any graphic to your design.

Graphics
Now, we need to add a graphic to our design. You can get free images on Pixabay and Unsplash. I prefer to use illustration over photos – they just look better on t-shirts. However, be sure to do a reverse image search on free images to make sure that they haven’t been stolen from a paid site like Shutterstock. Using images without a proper license can get you in trouble with the owner and Merch By Amazon.
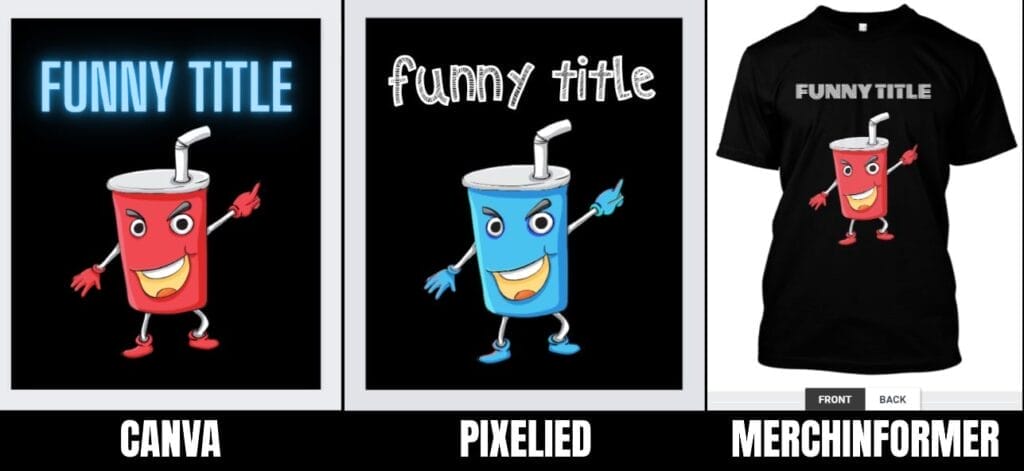
For better quality graphics, you can use Vexels and CreativeFabrica to find graphics. I prefer to use vector graphics (SVG) as they can be scaled to any size without losing quality. Find an image that you like – that’s related to your text – and add it to your design. You’ll end up with something like this.

Canva vs. Pixelied vs. MerchInformer
Any one of these tools will enable you to make great designs.
Canva – has the most number of text effects, as well as effects that can be added to images to make them look glitchy, pixelated, etc. It’s the most used tool when it comes to creating designs for Merch By Amazon.
Pixelied – with Pixelied, you can change the colors of vector images directly in the tool. Every shade of color will show in the toolbar, and you can adjust them to the way you like.
MerchInformer – with MerchInformer, you can clearly see how your design will sit due to their templates for each Merch By Amazon product. Normally, you’d have to upload to MBA, see how it sits – then make adjustments in your design tool. This step can be skipped when using MerchInformer.
I use all 3 tools in my design process. For design creation, I probably use Canva more than Pixelied. MerchInfomer is mostly used for researching ideas and for making quick text variation designs.
Uploading to Merch By Amazon
1. Upload a design for a product. If you’re just starting out with Merch By Amazon, then you’ll be in Tier 10 with 10 slots available to upload to. Firstly, make sure you’ve checked for trademarks before uploading, and of course – don’t use words like Disney, Star Wars, Spock, or any other copyrighted terms.
2. Set the price and availability of the product. In lower tiers, I like to set my prices as low as possible to try get some sales and tier up. You can find out more about tiering up here: 5 Ways to Get Out of Amazon Merch Tier 10
3. Wait for your product to be approved by Merch by Amazon. When you’re just starting out, wait for each design to be approved before uploading another. In this way, if your design is rejected, you can ensure that you don’t make the same mistakes with your next upload. Too many rejection can lead to your account being closed.
5. Wait for payday.
You can use the same techniques above to make designs for any of the products listed in MBA’s catalogue. Don’t wait – Start a Merch By Amazon T-Shirt, PopSocket, Hoodie or Tote Bag Business today!
Hey there! I’ve been blogging for over fifteen years and have had the pleasure of writing for several websites. I’ve also sold thousands of books and run a successful digital sales business. Writing’s my passion, and I love connecting with readers through stories that resonate. Looking forward to sharing more with you!


